
This article explain how to configure the BusinessWorks HTTP Client connection resource to access REST API or WEB Services exposed over HTTPS.
In the most common scenario (one way SSL) the BusinessWorks client application need to be configured to use at least one of the certificates of the HTTP server public certificates chain.
It is also possible in BusinessWorks to manage a two way SSL configuration (mutual authentication), to do that you need to have a private key to configure the BusinessWorks client application and the related public certificates to configure the HTTP server. The set-up of such configuration is not covered in this article.
Useful elements explaining how to debug an HTTPS configuration are also included at the end of this article.
# Access to an API or a Service exposed over HTTPS using a certificate issued by a certification authority commonly used in the Internet environment
In that scenario it is generally possible to use the ‘Default Confidentiality’ option.
For example the sample REST API https://catfact.ninja/ can be accessed using this approach:

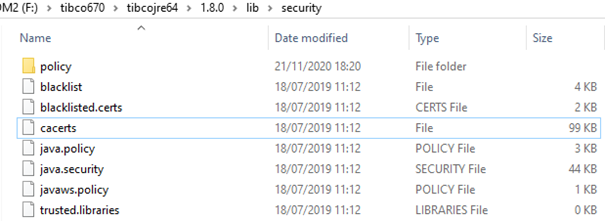
In this configuration BusinessWorks is using the public certificates present in the TIBCO JVM default trustore file name ‘cacerts’ and present in the following folder : <TIBCO_HOME>\tibcojre64\1.8.0\lib\security
If a needed public certificate is not present in the default store file it is possible to add it with tools like ‘keytool’ provided with the TIBCO JVM. Meanwhile this is not recommended to do so because this change could be lost after installing a TIBCO JVM upgrade (sometimes included in BusinessWorks hotfixes).
# Access to an API or a Service exposed over HTTPS using a certificate issued by a private certification authority
In that case you have to create a truststore file containing, in general, at least one of the certificates from the HTTP server public certificates chain and configure the HTTP client connection to use this public certificate.
The trustore file can be created in different ways.
One possible approach is to use the ‘keytool’ tool present in the following folder : <TIBCO_HOME>\tibcojre64\1.8.0\bin
To download the public certificate chain of an HTTPS server you can use keytool with the following options :
keytool -printcert -sslserver <host>:<port> -rfc
For example to download the public certificates of the https://catfact.ninja server you can use the following command:
For example : keytool -printcert -sslserver catfact.ninja:443 -rfc

Note that all three certificates of the certificate chain are downloaded (only one is displayed in full above).
Another option to download public certificates is simply to use a Browser (you can find how to do this on sites like stackoverflow).
To create a trustore file and import one of the public certificates obtained in the previous step, you have to copy the selected certificate from the previous output in a temporary file (including the ‘ — BEGIN CERTIFICATE — and — END CERTIFICATE — lines) and use keytool with the following options :
keytool -import -noprompt -alias <your_alias> -keystore <your_trustore_file> -storepass <your_password> [-storetype <store_type>] –file <your_file_containing_a_public_certificate>
Example:

The content of the created keystore can be verified using keytool with the following options:
keytool -list –v -keystore <your_trustore_file> -storepass <your_password>
Example :

The trustore file can also be created with the KeyStore Explorer tool under Windows, which provide equivalent functionalities but in a Graphic format.
Downloading public certificates with KeyStore Explorer (using Examine SSL menu):

Importing a certificate in the Keystore with KeyStore Explorer :

It is generally possible to include only one of the server public certificates. Depending on your needs select the certificate with the shortest life span (for more security) or a certificate with a longer life span (for less maintenance but also a bit less security).
The HTTP client connection can be configured to use the truststore using the following approach.
#1 Configure the HTTP Client connection resource to use ‘Confidentiality’ with an ‘SSL Client Configuration’

#2 Create an SSL Client Configuration
Click on the ‘…’ button, the following screen appears :

Click ‘Create Shared Resource’, the following screen appears, enter a name for the Resource and click finish :

The HTTP client resource configuration should now look like this :

#3 Configure the SSL Client resource
Open the previously created resource, the following screen appears:

Create a Key Store Provider and adjust the values of the SSL parameters.
Note that the ‘Enable Mutual Authentication’ option is left unchecked while we are setting up a ‘one way SSL’ configuration in this article.
The SSL Security provider can usually be left blank (in that case the default ORACLE JVM SunJSSE security provider is used).
Select the SSL Protocol and SSL Cipher Class has needed (the default configuration is a good choice if accepted by the remote server).
#4 Create a Keystore Provider
Click on the ‘…’ button, the following screen appears :

Click on ‘Create a Shared Resource’, enter a name for the Keystore provider and click on Finish:

# Configure the Keystore provider
Open the previously created resource, the following screen appears:

In Linux and Windows environments, the Provider should be set to ‘SUN’.
The URL parameter should be set with the full path of the truststore file (for example: C:\Demo\CatFactsKeyStore.jks) and it is recommended to manage it with a property.
The Password parameter should be set with the truststore file password defined at the truststore creation time and it is recommended to manage it with a property.
The Refresh Interval can be left to its default value.

The SSL Client configuration should now look like this :

Useful to know
BusinessWorks applications are periodically re-reading application truststore files (at the period defined by the ‘Refresh Interval’ — each hour by default) to allow updating truststore files without downtime (this also applies to keystore files).
Useful elements to debug an HTTPS configuration
# To enable SSL/TLS debug logs in Studio (design time)
Add below property in VM argument (in Debug configuration of Studio) :
-Djavax.net.debug=ssl,handshake,all

# To enable debug logs for a deployed application (runtime)
Add below property in the appnode tra file under <TIBCO_Home>/bw/6.x/domains/<YOUR_DOMAIN>/appnodes/<YOUR_APPSPACE_NAME>/< YOUR_APPNODE_NAME>/bin folder :
java.property.javax.net.debug=ssl,handshake,all
Run the appnode from the command line using nohup as below:
nohup ./startBWAppNode.sh &
As an alternative, you can edit the startBWAppNode script and redirect the output to a file, for example:
"D:\BW670\bw\6.7\domains\D1\appnodes\AS1\AN1\bin\bwappnode-AN1.exe" --propFile "D:\BW670\bw\6.7\domains\D1\appnodes\AS1\AN1\bin\bwappnode-AN1.tra" -config "D:\BW670\bw\6.7\domains\D1\appnodes\AS1\AN1\config.ini" -l admin start >appnode_console.log
Additional security mechanism
It is also possible to define in the SSL Client Resource configuration the expected Certificate common name (that is usually the name of the remote server). At runtime if the received certificate common name doesn’t match the expected host name the SSL connection is closed.

Useful link
The KeyStore Explorer tool can be downloaded at the following URL : https://keystore-explorer.org/
It works on Windows, Linux and MacOS.
Additional elements
You can refer to the attached project.
Recommended Comments
There are no comments to display.
Create an account or sign in to comment
You need to be a member in order to leave a comment
Create an account
Sign up for a new account in our community. It's easy!
Register a new accountSign in
Already have an account? Sign in here.
Sign In Now