
While Oauth 2.0 is now the de facto industry standard for online authentication and authorization this is a very common requirement for BusinessWorks applications to have to use Oauth 2.0 tokens to call REST APIs.
It is possible in BusinessWorks to call the standard Oauth 2.0 REST API to get and refresh a Token, store it in a Shared Variable and add it in the HTTP Authorization each time this is needed, but to make things more simple for developpers an ‘Oauth Configuration’ Shared Resource has been introduced with BusinessWorks 6.7.0 and BusinessWorks Container Edition 2.6.0.
This article is to explain how to use this new resource.
Things to know
With BusinessWorks 6.7.0 and 6.8.x and BusinessWorks Container Edition 2.6.x and 2.7.x versions the ‘Oauth Configuration’ shared resource is only managed when using the ‘Invoke‘ activity with a REST Client binding.
Starting from BusinessWorks 6.9.0 and BusinessWorks Container Edition 2.8.0 the ‘Oauth Configuration’ Shared Resource can be used with the ‘Receive mail’ activity.
Starting from BusinessWorks 6.9.1 and BusinessWorks Container Edition 2.8.2 the ‘Oauth Configuration’ Shared Resource can be used with the ‘Invoke REST API’ and ‘HTTP Request’ activities.
Creating an ‘Oauth Configuration’ Shared Resource
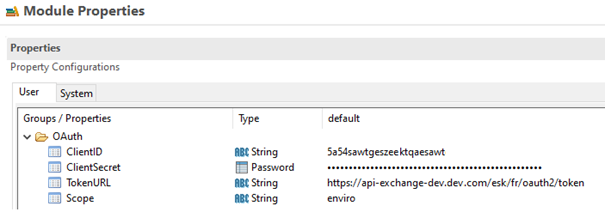
It is recommended to first create properties to configure the ‘Oauth Configuration’ shared resource, this has to be done for the following fields:
. Client ID of type String
. Client Secret of type Password (which means the Client Secret is obfuscated in the BusinessWorks environment)
. Token URL of type String
. Environment of type String
Then the resource has to be created and configured:
. Set the configuration fields of the resource with the properties selected earlier
. Set the Grant Type (Client Credentials or Resource Password)
This is also generally needed to create an ‘SSL Client Configuration’ shared resource to access the Oauth 2.0 server and then configure the ‘Oauth Configuration’ shared resource to use it.
The SSL Client Configuration’ shared resource can be created by following explanations available in that article:
Once configured the ‘Oauth Configuration’ shared resource should look like this:

The capability to get a Token can be tested using the Test Connection button:

Using an ‘Oauth Configuration’ Shared Resource
To use the created ‘Oauth Configuration’ shared resource you have to refer to it in an ‘HTTP Client’ shared resource by checking the ‘OAuth configuration‘ option and selecting the target ‘Oauth Configuration Provider’ in the Security section.

There is nothing to do in the REST Client Binding once the HTTP Client resource has been configured.

The Token refresh interval can be defined using the BUFFER_INTERVAL_FOR_REFRESH_TOKEN property (the value should be set in seconds).
In Studio this can be set in the ‘Arguments’ tab of the ‘Debug Configuration’ dialog with the ‘-D’ option:

In runtime this can be set with in the config.ini file of the target appnode, for example:
BUFFER_INTERVAL_FOR_REFRESH_TOKEN=3600

Additional elements
To debug issues with the Oauth Configuration Shared Resource you can add the following tags in the logback.xml file:
<logger name=”com.tibco.bw.sharedresource.oauth”>
<level value=”TRACE”/>
<appender-ref ref=”STDOUT”/>
</logger>
Recommended Comments
There are no comments to display.
Create an account or sign in to comment
You need to be a member in order to leave a comment
Create an account
Sign up for a new account in our community. It's easy!
Register a new accountSign in
Already have an account? Sign in here.
Sign In Now